
Halloween is the perfect time to test out the new Hummingbird Bit from Birdbrain Tech. My plan is to create a remotely controlled ghastly ghost or scary skull, something that can be triggered at a little distance to light up and move.
For $6, I picked up a hanging phantom from Target. It’s not mechanical or electrical, just a wireframe with two hands and a skull, draped in creepy clothing. To make this creature “come to life” so to speak, I need to embed some coding and robotics.

Enter the Hummingbird Bit. This latest robotics kit from Birdbrain Technologies integrates the Hummingbird Robotics board with a Micro:bit. Those of you familiar with the original Hummingbird and Hummingbird Duo boards know that they perform all work while connected to a computer (tethered). The code runs on the computer which then communicates to the board in real time.
There is one exception. The Duo can be untethered by using its built-in Arduino on the underside. However, the conversion of code from Hummingbird to Arduino is an extra step that requires testing, troubleshooting and additional time.
The new Hummingbird Bit, along with a connected Micro:bit (purchased separately), can be programmed using MakeCode. The .hex code file that gets uploaded to the Micro:bit allows it to run independently (untethered) from a computer. This is a much simpler solution and provides more mobility without the need for any computer connections.
Below are two shots of the Hummingbird Duo and Hummingbird Bit side by side:
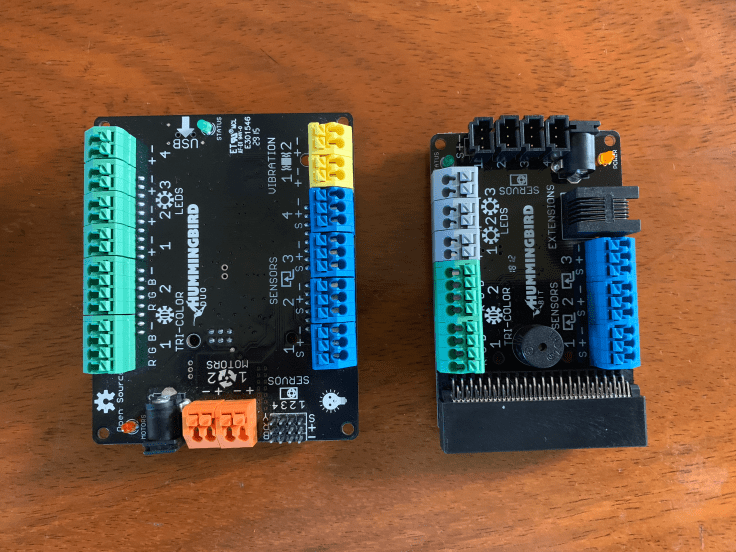
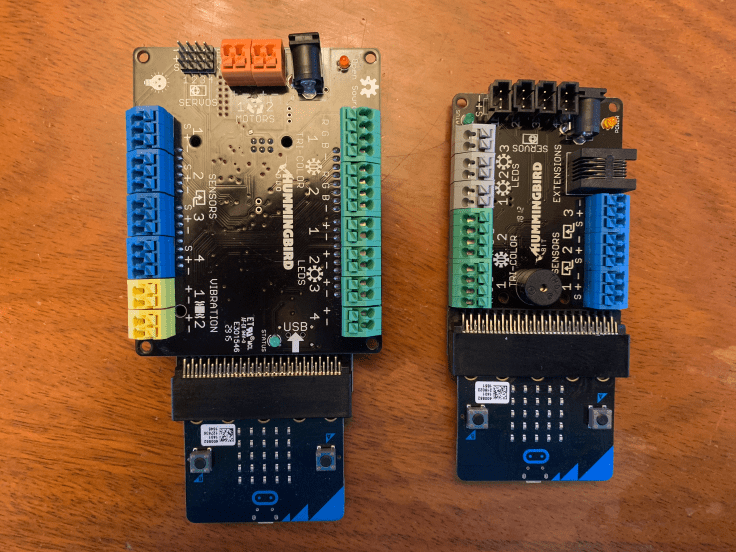
As you can see from the photos, the Hummingbird Bit is considerably smaller than its older sister. While it gives up some ports (no more DC motors or vibration motors and fewer sensor and LED ports) it adds a piezo buzzer and the use of full rotation servos. These full rotation servos can work in place of DC motors for projects that require wheels, for example, or any other component that needs to rotate a full 360 degrees. And when the Micro:bit is connected, all of its goodies come into play (accelerometer, light sensor, compass, radio communication, LED array, and programmable buttons).
For my project, I decided to use two RGB LEDs for the creature’s eyes, and a servo motor to create a sense of movement (shake). Since I happen to have two Micro:bits available to me, I also take advantage of the radio communication so that I can control one bit with the other, remotely.
Here is my code for the “remote control” Micro:bit, using MakeCode. I establish a radio group on start (I pick the number 12, randomly). Then, when the A button is pressed on this remote Micro:bit, it sends out the number 1 across the radio signal. Pressing the B button will send out the number 0. These will make sense in the following paragraph.

Here is my code for the Hummingbird Bit. Notice that it also joins radio set 12 on start. Now these two Micro:bits can exchange information. I have this Micro:bit print out the word “BOO!!” on the LED array so that I know it’s working. The rest of the code is just waiting for a number to be received from the remote Micro:bit. See if you can figure out what it does when it receives the number 1.
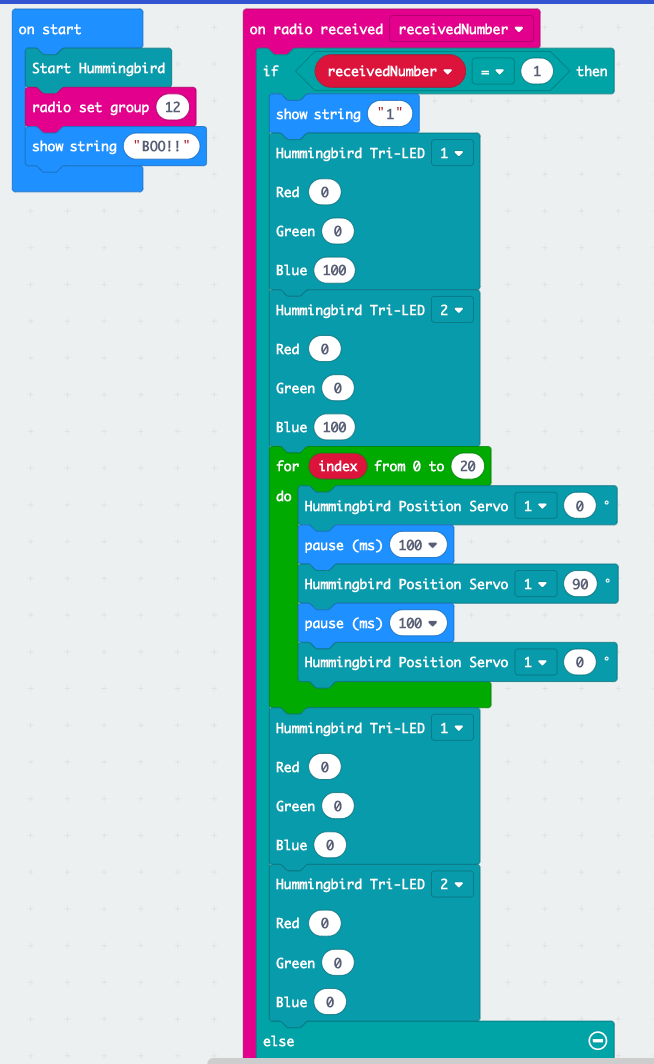
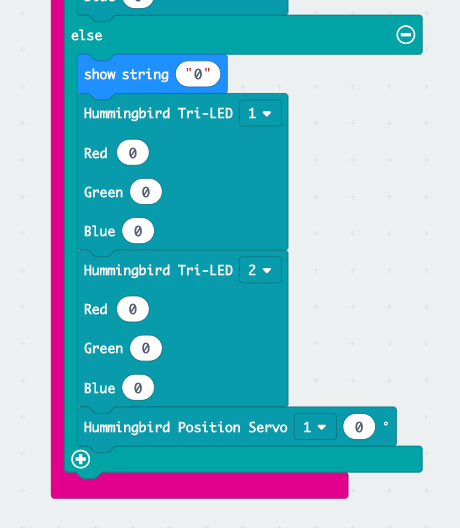
The Hummingbird Bit, upon receiving the number 1 via radio signal from the “remote” will print out the number 1 on its LED array (thereby acknowledging receipt of the signal). It will then light up two LEDs to the color blue at full power (100). It will also move the servo motor from 0 to 90 degrees twenty times, creating a shaking motion. I attached the servo to the back of the head in order to create this shake on the creature. The LEDs turn off after the shaking ends. If I send the number 0 on the “remote” all functions cease on the Hummingbird Bit.
Simple code for a fun effect. I am enjoying the Hummingbird Bit and see the immediate benefits gained by teaming up with Micro:bit, and untethering for greater mobility and flexibility.
This short clip shows an early version of the code in action:
And here’s the current working code:
What do you want to create with the Hummingbird Bit? Share in the comments below. Happy Halloween!!

Leave a comment