
I am forever seeking for a new/better tool for 2D design in my work with students. While I use Adobe Illustrator regularly for my graphic design work, the application is often overkill for my middle school students, both in cost and feature set. They need a way to create shapes, modify those shapes, add text, and adjust color settings. They need to output files to .svg, .pdf, or .png format. Generally, that is the most that students need for use with the laser cutter, vinyl cutter, 3D carver, and other digital fabrication tools we have in the lab.
Years back I was a big fan of Inkscape and even created a playlist of video tutorials on using this tool. I loved that it was free, and worked well on the Mac. I did find it slightly confusing for students when working inside the X11 environment rather than native OS X, but that’s a minor complaint. Now, with students on Chromebooks, I needed something web-based, and while Inkscape does offer a Chromebook extension, I believe I’ve found a better tool in Gravit Designer.
Gravit Designer is a free, comprehensive, web-based graphic design tool. You can log in with your Google or Facebook account, or create a new account from scratch. Files can be stored in the cloud, or on your computer. There are also downloadable versions of Designer for Mac, Windows, Linux, and Chrome OS.
The program is similar to Illustrator, Inkscape, or other vector-based editors, so anyone with experience in those applications will transition nicely to Gravit Designer. With just a basic introduction, one can quickly add shapes and text, create paths, combine and subtract shapes, adjust fill and border settings, and much more.
I found it helpful to break down the interface into four parts for my students, like this:
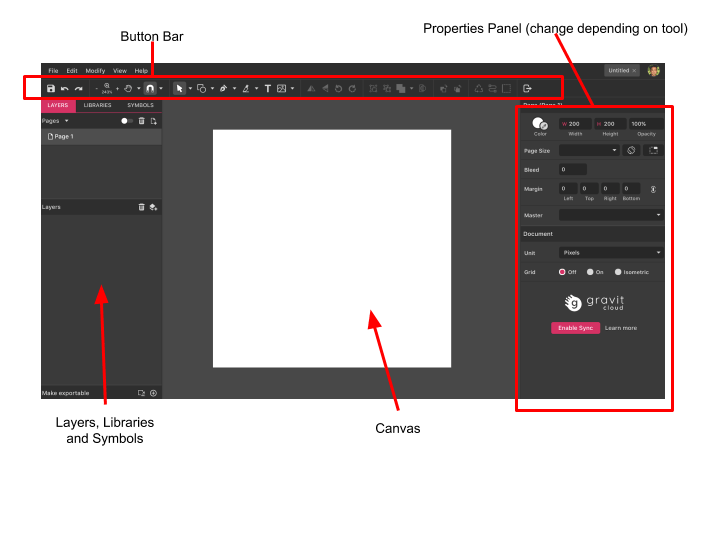
The Canvas is where current work is displayed. The Button Bar provides access to the tools, such as Select, Add Shape, and Add Text. The Properties Panel changes based on the tool that is selected. For example, when working with Shapes, the panel presents settings for adjusting those shapes, like fill and border colors. Finally, the Layers, Libraries and Symbols area is for modifying layers on the Canvas, adding clip art, and inserting pre-made shapes.
Once students have an understanding of where to find what they need, I emphasize the difference between creating simple shapes and converting those shapes to paths with adjustable points along the path. Text can also be converted to a path. Paths and points are the true power of a vector-based tool, as they open up the creative nature of graphic design, allow for scalability and adjustability, and serve as the building blocks for any artwork that eventually ends up on a laser cutter or other fabrication machine.
If you would like to get up and running on Gravit Designer, here is my QuickStart guide I use with students. I cover the essential concepts of shapes, text, paths and exporting files. For further study, here are a few video tutorials from Gravit, here.
If you work with elementary school children, you might try something even simpler than Gravit, like Vectr. Vectr is a web-based vector editor with a limited number of features and easy to understand interface. It is also free.
Do you have another vector editor to recommend? I’d love to hear about it in the comments below.

An excellent introduction to the software. Best wishes on the path to acquiring knowledge to you and your very fortunate students.
LikeLiked by 1 person
Great post thaankyou
LikeLike