
Working with middle school students on cardboard prototypes presents a number of challenges. Students at this age have had varying levels of experience making proper and accurate measurement, using tools effectively for cutting and marking, working with glue, and understanding design to a level that is up to the task of creating a three-dimensional prototype from something they have just drafted in two dimensions on paper.
This series of required skills is tough at any age, and only practice and exposure seem a reasonable remedy in helping a person improve work in designing and building with these materials.
In 7th grade, our students take a trimester course with a focus on using the Design Thinking Process to create a prototype solution for existing faculty and staff design challenges across campus. The purpose of the course is to give students the experience of building empathy for their “client,” defining the problem in their own words, then ideating, prototyping, testing, and sharing their product solution.
Thus far most, if not all, of these design challenges require students to make some sort of box-like design, whether that box ends up becoming a bookshelf, a wall organizer, a pencil and eraser holder, or some other need that exists on campus.
While prototype results have varied, it is clear that our students can do better work. The biggest issues revolve around precise measurement and cutting, and the overall stability of the end product.
Precise Measurement and Cut
To assist in the improvement of measurements and cuts, we introduced the carpenter’s square. It is fascinating to see how many students struggle with not only cutting a straight line, but in creating proper right angle cuts. Without this kind of accurate foundation, a prototype is off to a rough start. The carpenter’s square is a valuable asset to have on hand for this purpose.
In addition to precise measurement, students should have tools that allow them to cut straight lines. We use the Slice safety cutter and Fiskars snips for this purpose. To learn more about the tools we use in our space, see this post.
Greater Stability
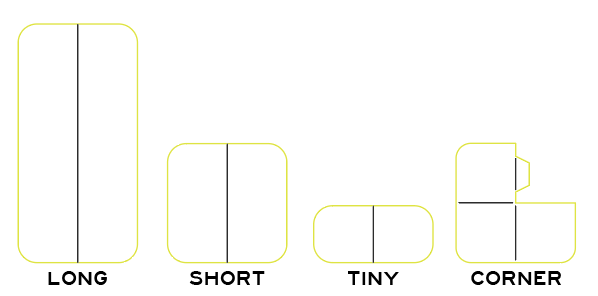
In pursuit of helping students to create prototypes of their solutions that are more stable, I designed these laser cut support pieces. Below you can see three sizes of linear support brackets which we laser cut from medium weight chipboard. Each of these is designed to support two adjoining sides of a given shape. The fourth piece is used to join the three sides of a corner from the inside.
With proper measuring and cutting tools, and the use of support brackets, students have a greater potential for developing better prototypes. To see how we introduce these tools and materials, see this video below:
The above video is the latest in a series on Cardboard Construction for Kids. To see the full playlist, click here.
To download a copy of the support brackets file for laser cutting, click here.
How do you support your students’ work on prototypes and working with materials such as cardboard? I’d love to learn from you. Please feel free to comment below.

Leave a comment