
I have long sought safe and simple ways for students to work with metal in our space. Or maybe better said, “I have long sought ways for me to work with metal.” The fact that students get to benefit from this desire is a plus, but I would be lying if I didn’t admit that the impetus for this project is personal. Getting to cut, bend, and shape metal (even just thin sheet metal) opens up a whole new world of possibilities when it comes to project creation. Need a custom handle, a way to stabilize a wood project, or to create a specialized belt clip for a costume accessory? Sheet metal to the rescue!
In researching the best methods to cut sheet metal in a safe and simple manner, I discovered that a few of my friends at k-12 Fablabs use the Nibbler from CaNibble. To see how it works, you can catch it in action on YouTube. The Nibbler chomps up and down like a mouth, “nibbling” away small slices as you guide it through your material, with the freedom to change directions as needed.
A Table Adds a Higher Level of Safety and Utility
Holding the Nibbler by hand, like you see in YouTube videos, certainly works. But in my opinion, it’s not the most convenient or safest way to make use of the tool, particularly for young students. For that, it is best to place the Nibbler in a table, similar to one you might build for a router, or Dremel. The tool head is installed just above the level of the table to allow you to push your material into it. This solves a couple of issues; it creates a flat surface on which a user can guide the material to be cut. It also stabilizes the tool, so that the user only has to manage the material, not the tool, in the hands. Using a table also allows for custom jigs, which I will discuss later in the post.
What follows are directions to make your own CaNibble Table.
Materials and Tools
The materials:
- One CaNibble Nibbler
- One Drill (I used an old surplus corded drill)
- One multi-outlet surge protector
- One 2′ x 4′ x 1/2″ birch plywood (more than I needed but easiest to purchase)
- Two drawer handles
- Two small non-swivel casters
- Two small swivel casters
- Zip ties
- Screws (various)
- Scrap wood
The tools:
- Circular Saw (or jigsaw, table saw, bandsaw)
- Brad Nailer (or hammer and nails, screws and driver)
- Sander (or sanding block)
- Hand Screwdriver
- Drill and bits
- Corner clamp (this isn’t critical, but helped me ensure I had panels set at right angles, 90 degrees)
The Build
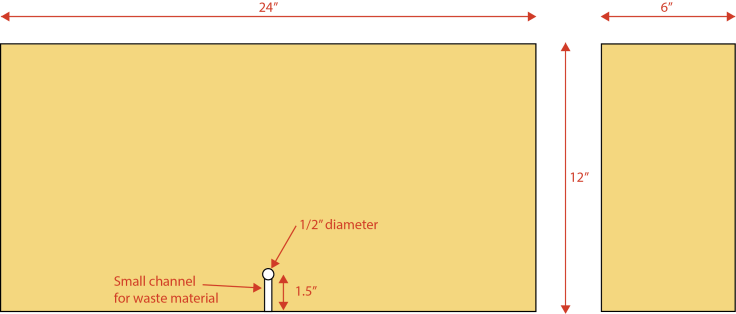
The top and bottom panels for the table measure 12″ x 24″. The 12″ depth was just enough for the Nibbler to be placed near the front of the table while keeping the drill from protruding out the back. Your own table may need to be deeper, depending on the kind of drill you have.
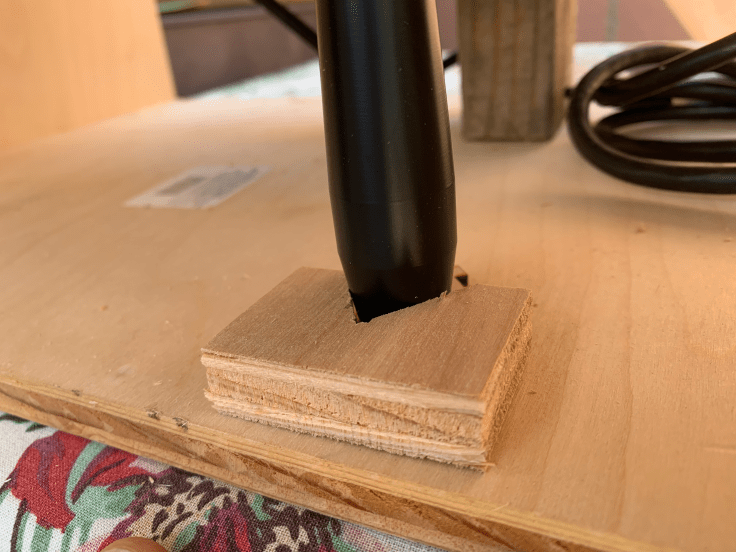
On the table top, I marked a spot about 1.5″ back from the front edge, on center. There, I drilled a 1/2″ hole to accommodate the head of the Nibbler. This recess of the Nibbler head (rather than placing it at the front of the table) allows the user to get a running start on the cut. IMPORTANT: The Nibbler releases the waste material out to the front, so in addition to the 1/2″ hole, it is essential to cut a small channel to allow for this byproduct to flow out (see diagram below). I learned about this the hard way, by clogging up the Nibbler after it was already installed.
The side pieces of plywood are 6.5″ x 12″. This was the perfect measurement to have the Nibbler head pop out at the right height…almost. During actual assembly, I needed a small piece of scrap wood (called a shim) to lift the Nibbler up slightly.
I assembled the bottom and sides first with my brad nailer (and corner clamp), and placed the Nibbler into the table top.

From there, I fastened the top to the sides and performed a light sanding to smooth out all the edges. Next, I determined the best locations for surge protector and drill. I decided to place the surge protector on the bottom right-side of the table using two-way tape. I didn’t add this to the material list because most people would just install two small screws to hold this in. I added a screw near the front right so that the excess cable can hang on it.
For mounting the drill, I used a scrap piece of 2″ x 4″ cut to size that propped the drill up and let it rest at a 90 degree angle. The photo at the top of this blog post shows its position. I wrapped its cord around the wood, then plugged into the surge protector. I used a zip tie and a small hole in the 2″x4″ to keep the drill in place. While this is not the most secure way of fastening the drill, it does allow me to swap the drill out quickly should I need to replace it.
As mentioned previously, I used a small shim of wood below the Nibbler in order to give it the correct height above the table top. I also used a notched piece of scrap wood to hold the Nibbler in place so that it wouldn’t slide out of position. See photo below.
Portability
Because I plan to use this tool both at my home maker space, and at school, I need the ability to move it around. To accomplish this, I added casters and handles. The handles I placed on the side panels left and right. The casters I installed on the left side, two non-swivel and two swivel, like a shopping cart. I can push the table vertically when traveling down hallways, and use the handles for placing the unit on a counter or table when it is time to cut.
")
")
")
Overall, I am happy with the outcome. It took less than a day to design and build. Here is a quick video of the CaNibble Table in action.
Future Improvements
While the new table functions as expected, there are a couple of additions I will make in the near future. The first is a basket or trap of some kind to catch the waste material that is pushed out from the front. I will likely 3D design and print a cup or tray that can be easily removed and replaced. For now, I will simply vacuum the waste material, but having a catch will save that time and energy.
The second addition is a jig, or series of jigs, to guide material through for straight cuts, angles, curves and more. I will start with a straight cut jig and add news ones as needs arise.
What would you do to make this tool better, or more suited for the students with which you work?

Leave a comment