
You’ve heard the phrase “low floors, high ceilings” to describe something that is easy to get started on, yet has considerable growth potential. We often hear this phrase in technology for tools that are easy to learn, but powerful and comprehensive once you fully realize their open-ended nature and complexity.
In his book Lifelong Kindergarten, Mitch Resnick expands on this concept of low floors and high ceilings with the term “wide walls.” He argues that it’s not enough to merely state that something has a growth trajectory from easy to complex, but that in between there should exist a wide range of horizontal growth.
I love tools with low floors, high ceilings, and wide walls. Not just for students, but for me too. I enjoy it when I can jump into something quickly, without of great deal of hassle, and yet once there, discover that there so much to explore and learn. With each new hill climbed, a lush valley awaits on the other side.

Scratch
The tool in focus for Lifelong Kindergarten is Scratch. Developed out of the Lifelong Kindergarten group at MIT, Scratch is a block-based coding language that incorporates art, music, and simple drag and drop blocks that bring a project to life. Scratch is the block-based language that virtually all other block-based languages were inspired by, and yet fall short of, in my opinion, and it’s due to the wide walls.
With just a couple of blocks of code, you can make a cat dance across the stage. With a few more blocks, the cat can say something, grow, and change its appearance. Now add a forever loop, and an IF statement, and suddenly the cat seems to have a mind of its own, making decisions based on your coding options. Most other block-based coding languages are indeed easy to start and teach important coding concepts along the way (like conditions and variables). But they generally have a defined end-point, so that the path from low floor to high ceiling is linear.
Scratch has an infinite number of paths from low floor to high ceiling, and you, as the coder, can determine your path and endpoint. And what makes Scratch even more powerful is the social nature of the platform, as all projects made by any member can be remixed (use it as a template to start your personal project), or you can borrow bits of code by placing them into your virtual backpack for later use in another project.
If learning from other examples isn’t enough, there’s even an entire wiki site dedicated to documenting all the code and sample uses for it. One of my students just this week used the wiki site to learn about simulated gravity so that he could insert this code into his platform game.
Scratch is celebrating its tenth year, and version 3 is in the works. I can’t wait to see what the future holds.
Hummingbird Robotics
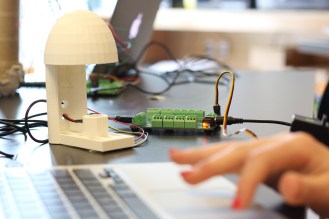
The next tool on my list that fits the description of low floors, high ceilings, and wide walls is the Hummingbird Robotics platform. Born out of Carnegie Mellon’s CREATE lab, the Hummingbird is a programmable controller that can connect lights (LEDs), motors (DC, servo, vibration) and sensors (distance, sound, light and more) together with all manner of building materials to create an object that senses its environment and reacts to it.
The versatility of this board is shown through the number of coding languages it can handle. Early learners can use the CREATE Labs Visual Programmer, which shows a picture of the board on the screen, allowing the user to select ports to turn on lights, rotate motors, and program sensors. As you move up in your skill level, Scratch, Snap!, and even BirdBlox on the iPad are some block-based languages that can control the Hummingbird. Finally, for the more advanced programmer, there’s Python, Arduino, Java and more.
Often referred to as physical computing, the intent with technologies like Hummingbird, Arduino, Micro:bit, and others, is that one can code a program on the computer and send that code to a board that then acts out whatever routine was created. Physical computing takes coding from the screen to the real world.
Here are two samples of the Hummingbird in action. In the first video, a pair of students integrates the Hummingbird into their Rube Goldberg physics project. Watch closely as board contains two sensors and two motors. A light sensor is triggered by the domino that drops into a cup. It moves the shelf that drops a new marble. The second sensor activates when the pulley brings a cup to its top-most position, and that sets off a final motor that spills sprinkles onto the cupcake.
In the second example, these students created an autonomous boat. Motors run the propellers on either side, and a distance sensor resides up front. When the boat detects that it is getting too close to an object, it sets the motors in reverse, one faster than the other. This action forces the boat to back up and turn in a new direction, before heading off again.
If you’d like to learn more about Hummingbird, I’ve posted this playlist of instructional videos to get you started.

Tinkercad
The last tool in my list is Tinkercad, a free, web-based, 3D design tool from Autodesk.
Starting with primitive shapes, you drag blocks onto the workplane. They can be combined, reshaped, and even reduced from each other to create just about anything. What I like about Tinkercad for students is that, for the most part, movement of objects is drag and drop. However, you can be precise, using alignment tools, mirroring, and an onscreen ruler. Dimensions can also be typed in for more accurate measurements.
This year, my students are creating a City of Light. They design three items for this city, a vehicle, a building, and a third object of their choice, like a lamppost, park bench, stop sign, etc. Once printed, the models are painted and put on display.
While Tinkercad has basic tools (low floor) and more advanced tools (high ceiling), it’s what you create in this environment that provides the wide walls. You may choose to have students design an object that offers a solution for someone else, as these 7th graders did when they created the parts for a marble run for their lower school buddies. You might hold design competitions, like this one where students designed a stand for a mobile device. Or join a national initiative like Future Engineers, where students have specific challenges each year with the winning designs helping NASA. To incorporate the Design Thinking Process into your unit of study, take a look at the CityX Project and its free, downloadable resources and lesson plans.
You can view this playlist of instructional videos on Tinkercad to get started today.
A Community of Learners and a Gateway to Further Learning
Each of the above tools is supported by an active, growing, online community of learners. You can find examples of what others have done and be inspired by their work. In the case of Tinkercad and Scratch, existing models and solutions can be incorporated into your design. I take the time to emphasize the power of this sharing with students, and the importance of giving attribution to original designers when borrowing.
In addition to the learning community, another characteristic of these tools is their role as a gateway to much more learning. Students learning Scratch can move to Python, Java and other text-based coding languages and feel confident knowing core concepts like conditions, variables, and loops. Hummingbird itself offers multiple programming languages, but can also lead to Arduino and its many variants, Raspberry Pi, Beaglebone, and even the creation of a personal microcontroller. Tinkercad, an Autodesk product, is the little sister to Fusion 360, a full-fledged 3D design tool.
What is Your Favorite Tool?
Do you have a favorite tool with low floors, high ceilings, and wide walls? I am always looking to learn more about tools that can grow with students, and become an essential component of their tool belt. Please share what you’ve used and can recommend.
