Overview of the Project
The objective of this project was to introduce our 7th-grade students to the world of automata. Using a 4″ x 6″ cardboard box, 1/4″ dowels, and laser-cut pieces for elements like cams and cranks, each student embarked on a journey to create their own moving sculpture. The students were given the freedom to choose a theme or topic, with the only condition being that their creation should fit well on top of the box and function smoothly. This project serves as a practice round for a more comprehensive wooden automata project that the students will undertake in 8th grade related to their future capstone topics.
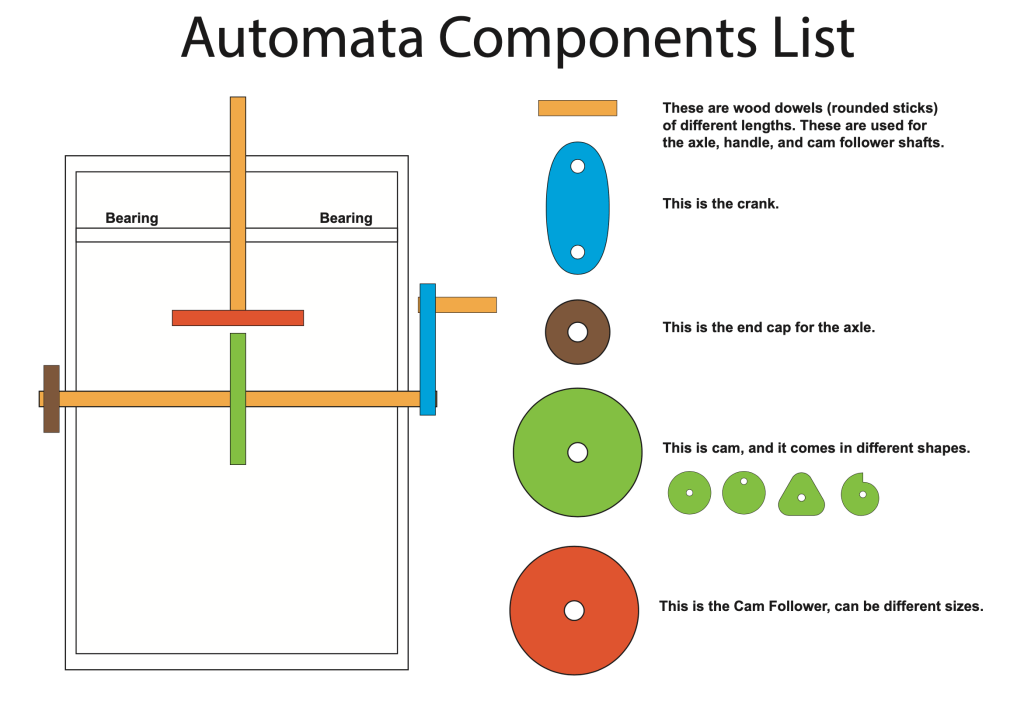
Materials Used:
The following materials allow for flexibility in design coupled with enough consistency to keep troubleshooting manageable.
- Box – 4″ x 6″ cardboard box
- Wood dowels for axles and cam followers
- Wood for laser cut cams, cranks, and cam followers
- Air dry clay for art decoration and weighting down of cam followers
- Cardboard
- 18-20 gauge wire for linking items together
- Illustrator and PDF files for cams
- Illustrator and PDF files for bearing
- PRO-TIP: I save old bicycle innertubes, slice them up, and use the small bands as tread around the cams to give them more grip. They also make for great tires on small wooden car wheels.
Tools Used:
We have these tools in our makerspace for working with cardboard and other thicker materials.
- SLICE Cutters – For initial cuts to box openings front and back
- Heavy Duty Hole Punch – For axle and cam follower holes
- Cardboard Cutting Scissors – Great for thicker cardboard
- Canary Cutters – Works well to cut out front/back openings on box
The Four-Day Journey to Cardboard Automata Mastery
Introduction and Daily Guidance
The project was structured over four 70-minute sessions, each with a specific set of goals outlined on the board each day. A simple guide was also provided at each table, detailing the evaluation criteria and expected daily outcomes. This helped keep students on track and focused on the day’s objectives.
Day 1: Introduction and Ideation
On the first day, students were introduced to the concept of automata. They observed various samples and brainstormed the common elements and unique features they could incorporate into their own projects. By distinguishing between common elements and unique elements in the samples they reviewed, they were able to determine what the project requirements were and where their artistic expression could come into play.
This day was also about getting hands-on with the materials; students assembled their boxes, gathered essential components like axles and cranks, and began sketching their initial ideas. Some even took to Canva to create their artwork.
Day 2: Finalizing the Concept
Day two was all about decision-making. Students finalized their ideas, cut the dowels to the required lengths, and chose the cams that would bring their creations to life. The day was also spent refining the artwork that would eventually adorn the top of their automata. Some testing took place this day as well, even though few elements were actually glued in place.
Day 3: Assembly and Testing
The third day was a whirlwind of activity. Students began assembling their automata, gluing pieces together, and in some cases, adding finer details with paint, wire, or small cardboard cutouts. The focus was on testing and retesting to ensure smooth operation.
Day 4: The Final Touches
The last day was reserved for last-minute tweaks and modifications. Each student filmed a short video showcasing their automata in action and uploaded it to Google Classroom.
Overcoming Challenges
The journey wasn’t without its roadblocks. From precise measurements to handling a variety of materials, the challenges were many but served as valuable learning experiences. The students’ perseverance and patience were tested, but the end result was well worth it.
Eureka Moments
Perhaps the most rewarding part of the entire process was witnessing the students’ eyes light up when they overcame a challenge or when their automata worked as intended. These moments of realization and accomplishment made the entire journey worthwhile.
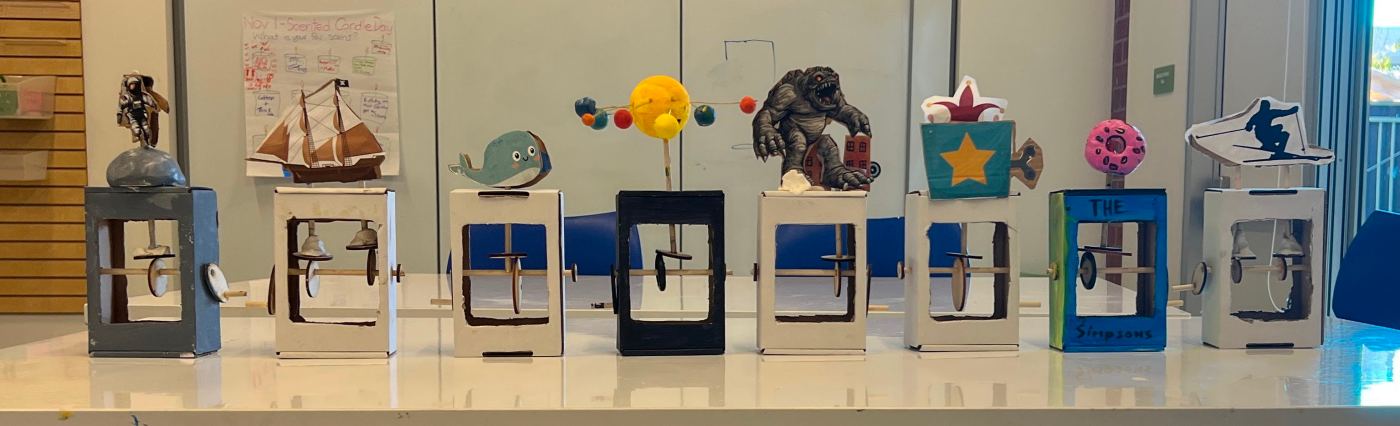
The Final Pieces: A Showcase of Creativity and Ingenuity
The culmination of four days of hard work, creativity, and problem-solving is inspiring. Each student’s automata is a showcase of their imagination and the skills they’ve honed over the course of the project. From intricate designs that tell a story to simpler yet equally captivating pieces, the variety is a joy to see.
Some students opted for nature-themed automata, with cams and levers designed to mimic a snake’s forked tongue or the jump and spin of a chimpanzee. Others took a more whimsical approach, creating fantastical creatures or abstract art that comes alive with the turn of a crank.
What’s particularly striking is the attention to detail. Whether it’s the carefully painted surfaces, the use of unique cams, or the smoothness of the moving parts, it’s clear that a lot of thought and effort has gone into each piece. And let’s not forget the joy and sense of accomplishment evident in each student’s face as their automata springs to life, captured forever in the videos and photos they’ve shared.
Reflection: Lessons Learned and the Path Forward
As we look back on this project, it’s clear that it was much more than a simple crafting exercise; it was a journey of discovery, problem-solving, and personal growth for each student involved. The project not only honed their technical skills but also developed their ability to think critically and adapt to challenges.
The roadblocks encountered were not setbacks but rather opportunities for learning. Students learned the importance of precise measurements, the characteristics of different materials, and the value of trial and error. They also discovered that patience and perseverance are just as crucial as technical skill in bringing their visions to life.
Moreover, the project served as a valuable precursor to the more complex wooden automata they will be creating in their 8th-grade capstone projects. The skills and insights gained here will undoubtedly serve them well as they take on more challenging endeavors.
But perhaps the most significant takeaway is the sense of accomplishment and the boost in self-confidence that comes from creating something with one’s own hands. The sparkle in their eyes when their automata worked as intended, or when they figured out a solution to a vexing problem, is something that can’t be measured but will surely be remembered.
As educators, it’s moments like these that remind us why we do what we do. I look forward to seeing how these young minds will apply what they’ve learned here to future projects and challenges, both inside and outside the classroom.

Leave a comment